
A project timeline is a visual schedule that shows your project’s tasks in the order they happen, each with a start and end date. To create one, you list every task, estimate how long each will take, put them in sequence, mark your key milestones, and assign real dates. This article walks through the whole process, with a worked example you can copy.
Contents
TL;DR
- A project timeline is a visual schedule of your tasks laid out in the order they happen, with start and end dates.
- You build one by listing tasks, estimating how long each takes, setting the order, adding milestones, and assigning dates.
- Weekends and holidays matter; most projects run on working days, not calendar days.
- You can put a timeline together in a spreadsheet, but a dedicated tool is faster and easier to update when dates shift.
What is a project timeline?
A project timeline is a chronological view of everything that has to happen to finish a project, from the first task to the final deliverable. It shows what needs doing, in what order, and by when.
It’s different from a plain to-do list because it accounts for time and sequence. A to-do list tells you the work exists. A timeline tells you when each piece starts, how long it runs, and what has to finish before the next thing can begin.
Most teams use a timeline for three things: to set a realistic end date, to spot where work piles up, and to keep everyone looking at the same schedule instead of guessing.
What goes into a project timeline
Before you build anything, it helps to know the parts. A timeline is made of:
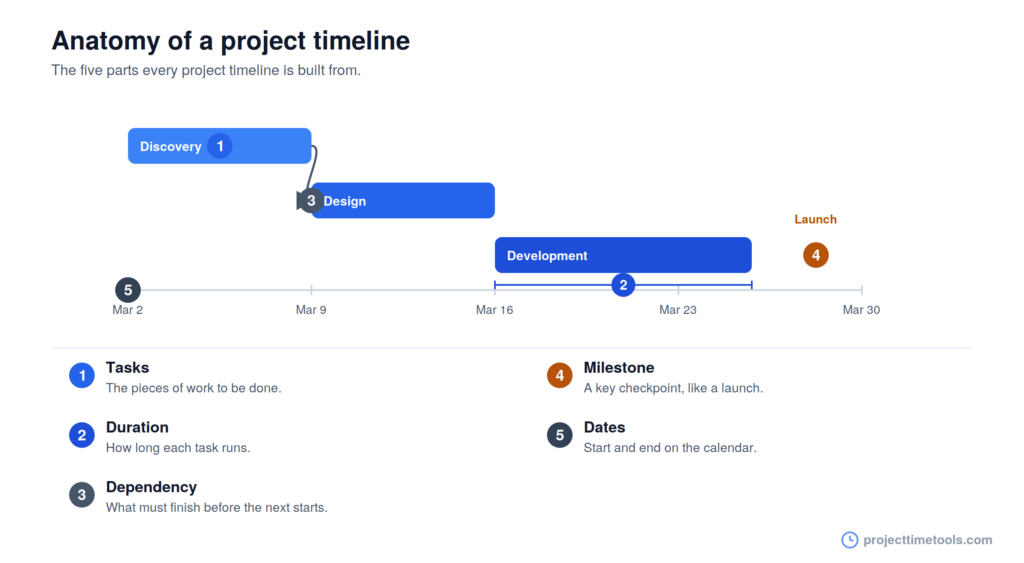
- Tasks and deliverables — the actual work, broken into pieces small enough to estimate.
- Durations — how long each task takes. This is where most timelines go wrong, so estimate honestly.
- Dependencies — what has to finish before something else can start. You can’t test a feature before it’s built.
- Milestones — the checkpoints that mark real progress, like “design approved” or “launch.”
- Start and end dates — the calendar dates each task runs, based on your durations and working days.
Get these five right and the timeline mostly draws itself.
How to create a project timeline in 7 steps
1. List every task
Write down all the work the project needs. Don’t worry about order yet — just get it out of your head. Break big chunks into smaller tasks you can actually put a number on. “Build the website” is too big to estimate. “Design the homepage” is not.
2. Estimate how long each task takes
Give every task a duration. Use past projects as a guide where you can, and be realistic rather than hopeful. If a task took two weeks last time, it will probably take two weeks again.
Not sure when a given duration lands you? Drop in the start date and length and let the Project Duration Calculator do the date math.
3. Put the tasks in order
Now sequence them. Ask what has to happen first, and what depends on something else being done. Some tasks run one after another; others can run at the same time. Mapping this out stops you from scheduling work that can’t actually start yet.
4. Add your milestones
Mark the moments that matter — a sign-off, a delivery, a launch. Milestones aren’t tasks; they’re checkpoints with no duration. They’re how you and your stakeholders track whether the project is on course at a glance.
The Project Milestone Planner helps you lay these out and keep the key dates in one place.
5. Assign start and end dates
Turn your durations into real calendar dates. Start from your project’s kickoff date and work forward, task by task. Keep in mind that most projects run on working days — if you schedule across weekends and holidays as if they were working time, your dates will drift.
To count only weekdays between two dates, use the Working Days Calculator. To add or subtract time from a date, use the Date Calculator.
6. Build the visual timeline
Lay it all out visually so the sequence is obvious. You can do this in a spreadsheet, but it’s slow to set up and painful to change. A timeline tool does it in one pass — enter your start date, durations, and milestones, and it plots the schedule for you.
7. Review, add buffer, and share
Look at the whole thing. Is the end date realistic? Where is it tight? Add a little buffer to the tasks most likely to slip — it’s better to plan for it than to explain it later. Then share the timeline with everyone involved so there’s a single source of truth.
A worked example
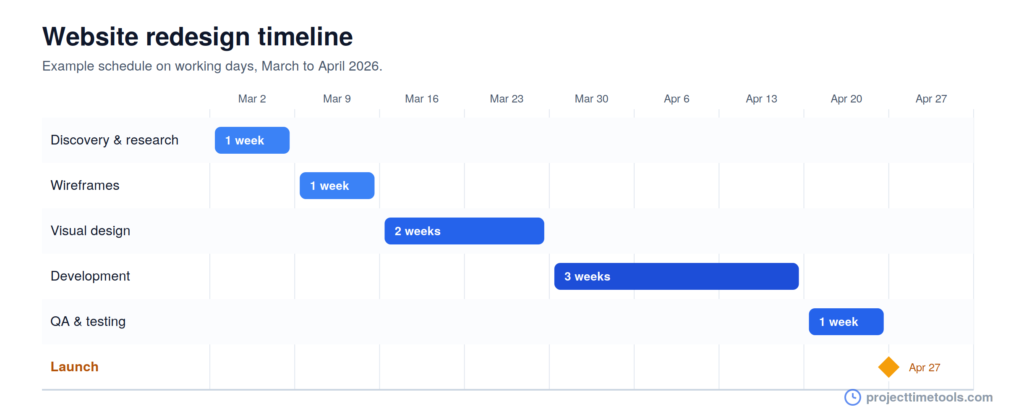
Say you’re planning a small website redesign that kicks off on Monday, March 2, 2026. Here’s how the timeline comes together once you’ve listed tasks, estimated durations, and assigned working-day dates:
| Task | Duration | Start | End |
|---|---|---|---|
| Discovery & research | 1 week | Mon, Mar 2 | Fri, Mar 6 |
| Wireframes | 1 week | Mon, Mar 9 | Fri, Mar 13 |
| Visual design | 2 weeks | Mon, Mar 16 | Fri, Mar 27 |
| Development | 3 weeks | Mon, Mar 30 | Fri, Apr 17 |
| QA & testing | 1 week | Mon, Apr 20 | Fri, Apr 24 |
| Launch (milestone) | — | — | Mon, Apr 27 |
Each task starts the working day after the last one finishes, so the schedule skips weekends automatically. The whole project runs about eight working weeks, landing on a launch date of April 27. If development slips by a few days, you can see immediately how it pushes everything after it — which is exactly what a timeline is for.
Ways to format a timeline
There’s no single correct format. Pick the one that fits the project:
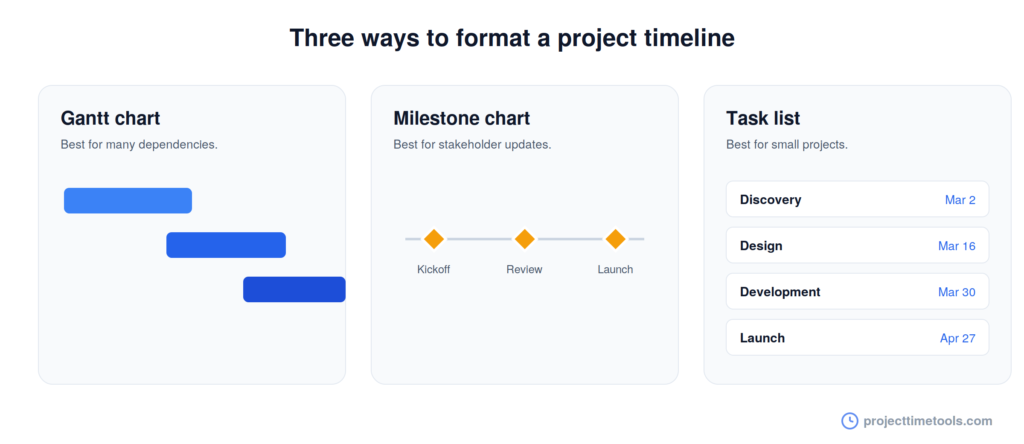
- Gantt chart — horizontal bars showing each task’s length and overlap. Best for projects with lots of dependencies.
- Milestone chart — just the key checkpoints on a line. Good for reporting to stakeholders who don’t need every task.
- Simple task list with dates — a table like the example above. Fine for small projects.
For most everyday projects, a straightforward timeline with dated tasks and a few milestones does the job.
Common mistakes to avoid
- Underestimating durations. Optimism is the number one reason timelines fail. Estimate for how work actually goes, not how you wish it went.
- Ignoring working days. Scheduling across weekends and holidays quietly stretches your real end date. Count weekdays.
- No buffer. A timeline with zero slack breaks the first time anything runs late — and something always runs late.
- Too much detail. A timeline with 200 micro-tasks is unreadable. Group work into tasks you can actually track.
- Setting it and forgetting it. A timeline is only useful if you update it when dates move.
Tools to Build Your Timeline
You don’t need heavy software to plan a project. These free tools cover the whole process, from building your timeline to calculating working days.
FAQs
A project timeline is a visual schedule that shows a project’s tasks in chronological order, each with a start and end date. It maps what needs to happen, in what order, and by when.
List your tasks, estimate how long each takes, put them in order, add your milestones, and assign start and end dates based on working days. Then lay it out visually with a timeline tool or spreadsheet.
A Gantt chart is one type of timeline. It uses horizontal bars to show each task’s duration and how tasks overlap, which makes it useful for projects with many dependencies. A timeline can also be a simple dated task list.
Most projects run on working days, so weekends and public holidays shouldn’t count as working time. If you schedule on calendar days, your real end date will usually be later than the timeline shows.
There’s no fixed rule, but adding some slack to the tasks most likely to slip protects your end date. Focus buffer where the risk is highest rather than padding everything equally.